How to Upload Jar to Multicraft Ftp
How-To'due south
Content
- Users and Players
- Assign Unlike Roles to Users
- Available User Roles
- Whitelisting / Private Servers
- Commands
- Built-in Commands
- Running Scripts
- Special Scripts
- Examples
- Custom JAR Files
- Determining which .conf file to use
- Default settings for all JARs
- CanaryMod
- Tekkit/FTB
- Forge
- StarMade
- PocketMine-MP
- Spigot and BungeeCord
- Bedrock alpha
- User Contribution: Updating BuildTools and Spigot (Windows Standalone)
- Server Templates (new in ii.0.0)
- Mod auto-setup
- Suggesting templates for JARs
- Automatically installing templates
- Examples
- Mod auto-setup
- Using MySQL / Decision-making a remote server
- Configuring the Daemon
- Configuring the Panel
- Configuring MySQL
- Secure MySQL
- Change the Mind Address
- Grant Admission to Daemon MySQL Users
- Open Firewall / Router for MySQL
- Cloud Installation / Mass Deployment
- Adding Region Logroller support
- Changing the port of the standalone webserver (Windows)
- How do I become FTP access to my server?
- Accepting the Minecraft EULA
- For individual servers
- For server providers
- Example i - Add a config file entry
- Example 2 - Add an "Accept EULA" button to the server settings (advanced)
- Instance 3 - Automatically create the file (avant-garde, Linux multiuser simply)
- Optional User Selectable Server Startup Parameters (new in ii.0.0)
- Limit Deejay Space / Quota Back up (Linux just, new in 2.0.0)
- Configure Linux Quota
- Configure User Friendly URLs
- Alter the Console Direction
- Send mails using SMTP instead of PHP mail()
- Daemon Callbacks (new in 2.0.0)
- Windows Standalone: Update Java
- Different Java Versions
Users and Players
Multicraft makes a difference between users and players. Users are registered control panel users that can apply various functions depending on their access rights for a specific server. Players are created equally presently as they are seen past a minecraft server. Each server has a separate list of players.
Players can exist assigned to users. By doing so the role player inherits the role of the user. The players role tin besides exist adjusted without linking it to a user and so it is optional for players to annals.
Assign Dissimilar Roles to Users
You can assign different roles to users, either per-server or globally:
- To assign a role to a user for a single server you can become to the settings folio of that server and and so nether "Avant-garde"->"Users" you can await upward the user and modify the role.
- To assign a office globally you can get to the user profile under "Users" and so change the "Global Role" setting. The part assigned here applies to all servers in the console so if a user has the global role "Administrator" they will be admin for all servers.
Available User Roles
The following list of bachelor roles is in ascending club, meaning the listed roles include the capabilities of all of the roles to a higher place them:
- Invitee
Can see basic data about a server similar online status and number of players - User
Tin can use chat, view bachelor commands and use certain cheat functionality if enabled by the server possessor - Moderator
Can commencement servers, apply the "admin say" command, see the server console, summon/kick/tp players, apply the "requite" command and download backups - Super Moderator
Tin issue server commands, end/restart the server and start backups - Administrator
Has full control over all server functions such as managing players, editing configs, etc. - Co-Owner
Can assign FTP access to other users - Owner
Can assign co-owner status to other users - Staff (Global Part only)
Has superuser access to all servers - Superuser (Global Role merely)
Has full superuser admission to the entire console and the console settings
Whitelisting / Individual Servers
To brand a server individual just gear up its "Default Role" to "No Access". The default role is the role assigned to all users/players that don't accept whatever other role assigned to them.
To allow access for a player to a private server you lot tin either create the histrion with a part greater than "No Access" or edit the player entry if it already exists.
Commands
You lot can define new chat commands or alter the function required to run built-in commands.
The "Prerequisite" field in the command create/edit class refers to another control that has to be run earlier this one. Commands fail silently if the user doesn't take the required role.
To run a command the player needs to have a role greater than or equal to the one divers in the command settings and say the string defined in the "chat" setting of the command in-game. To run the control silently (i.e. without press it in the chat) it can be prefixed with a slash, however, this does non work with all Minecraft versions.
asay Hello everyone!
When creating a new custom command you can define what is run on the Minecraft server by changing the "Run" field. If the command is preceded by "multicraft:" the command that will be run is the Multicraft control that has the "Conversation" field matching the specified cord, run into the MOTD example beneath. The following special sequences can be used in a command:
| %n | The players name |
| %one, %2, etc. | Every %X gets replaced by the X-th argument the player supplied (arguments are space separated) |
| %s | The whole argument string supplied. If %southward is used multiple times the argument cord is carve up past spaces every bit many times as there are %s arguments |
| %l | The players access level |
| %o | Empty string (tin be used to split up %1, %2, etc. from a number) |
Multiple commands can be separated using a semicolon ";". To escape the semicolon use a backslash "\;". Take care not to insert a space earlier a control (i.e. afterward the semicolon) as Minecraft won't translate that.
Congenital-in Commands
Built-in commands tin be called - just like Minecraft console commands - by using them in the "Run" field.
You can besides provide parameters in the "Run" field already, for example a command with "builtin:tell_level admin" in "Run" will cause a bulletin to be sent to every role player who is an admin. The thespian doesn't have to specify the level himself considering it's already provided.
| Command | Parameters | |
|---|---|---|
| builtin:asay | bulletin | Prints "message" equally the server |
| builtin:backup | Creates a new fill-in zip file | |
| builtin:date | Prints the current appointment | |
| builtin:requite | id [amount] | Gives the player the item with id "id". If corporeality is not specified 64 blocks are given. |
| builtin:kick | target | Kicks "target" from the server |
| builtin:listing | Tells the listing of players on the server to the histrion | |
| builtin:restart | Restarts the server | |
| builtin:restart_empty | Restarts the server only if no players are online | |
| builtin:salvage | Saves the world | |
| builtin:saylist | Prints the list of players on the server to everyone | |
| builtin:script | name | Runs the script "name". The script has to be defined in the scripts.conf file |
| builtin:beginning | Starts the server | |
| builtin:stop | Shuts down the server | |
| builtin:stop_empty | Shuts downwardly the server if no players are online | |
| builtin:summon | target | Teleports "target" to the thespian |
| builtin:tell_level | level message | Tells "message" to all players with their level greater than or equal to "level". "level" can be numeric or one of: user, mod, admin, owner |
| builtin:time | Prints the current time | |
| builtin:tp | target | Teleports the player to "target" |
| builtin:tp_other | player1 player2 | Teleports "player1" to "player2" |
Running Scripts
The built-in command "builtin:script" enables the users to run scripts y'all have defined for them in a special config file. By default this config file is called "scripts.conf" and expected to be in the Multicraft base of operations directory (where the multicraft.log lies). You can modify the path/name of this file in your multicraft.conf.
The format of the file is:
[cmd1] servers=all command={BASE_DIR}/script1.sh [cmd2] servers=2,three,7 command={BASE_DIR}/script2.sh [dangerous] servers=one command={SERVER_DIR}/userscript.sh The value in the [] brackets is what the user puts after "builtin:script". "servers" lists the server IDs of all servers that can run this command ("all" for all servers). "command" is the path to the script to run. The final control is chosen "dangerous" because it runs a script that lies in the server directory which means that the user can alter this script.
The following placeholders can exist used in "control":
| Placeholder | Example | |
|---|---|---|
| {BASE_DIR} | /home/minecraft/multicraft | The base Multicraft installation directory |
| {DAEMON_DIR} | /home/minecraft/multicraft/bin | The path to the Multicraft daemon executable |
| {DATA_DIR} | /home/minecraft/multicraft/data | The path to the daemon database (if using SQLite) |
| {JAR_DIR} | /home/minecraft/multicraft/jar | The path to the JAR directory |
| {SERVERS_DIR} | /dwelling house/minecraft/multicraft/servers | The directory that contains all the server base directories |
| {SERVER_ID} | half dozen | The server ID of the server running the command |
| {SERVER_DIR} | /home/minecraft/multicraft/servers/server6 | The base directory of the server running the command |
| {WORLD} | world | The proper name of the current world |
| {JAVA} | java | The default Java executable |
| {START_MEMORY} | 1024 | The amount of retention allocated on server startup |
| {MAX_MEMORY} | 1024 | The retention limit for this server |
| {JAR_FILE} | minecraft_server.jar | The JAR file used by this server |
| {JAR} | /home/minecraft/multicraft/jar/minecraft_server.jar | The total path of the JAR in use |
| {IP} | 192.168.i.24 | The IP of the server |
| {PORT} | 25565 | The port of the server |
| {MAX_PLAYERS} | 16 | The number of player slots for this server |
| {DAEMON_ID} | 1 | The ID of the daemon controlling this server |
| {PID} | 2589 | The process ID of the running server procedure |
| {PID_FILE} | /home/minecraft/multicraft/servers/6.pid | The file containing the servers process ID |
In the script itself you'll have admission to the same values listed above through surround variables. The base directory, for example, tin can be output using
repeat Base directory: $BASE_DIR
Special Scripts
The following script names are reserved equally they have special functions:
| Script name | |
|---|---|
| setup | This script is run when a server is initially setup. This only works when the daemon is online at the time the panel issues the command to run this script |
| _started | This script is run as shortly equally the server has finished its startup sequence. |
| _stopped | This script is run later on the server has been stopped. |
Examples
- Verbose kick
"Admin" says:Conversation kickmsg Run say %n: Boot %1 (%2);kick %1 kickmsg Knuckles "Foul language"
Result: The player "Knuckles" gets kicked and everyone sees the message "Admin: Kicking Duke (Foul linguistic communication)". - Give multiple items
"Admin" says:Conversation armor Run give %n 310;give %n 311;requite %n 312;requite %north 313 armor
Result: The histrion "Admin" receives a total diamond armor set.
- List online players in MOTD (message of the day)
Chat motd Run multicraft:listing - Running a PHP script on an external server regularly
Outset you lot need to define a section in your "scripts.conf":[extphp] servers=all command={BASE_DIR}/extphp.sh
Then yous need to create the script you reference in the config file:#!/bin/sh /usr/bin/wget -qO- "http://www.case.com/myscript.php?server_id=$SERVER_ID"
This script needs to be executable by the Multicraft user.Next, define the command:
Then create a new scheduled task and select the newly created command.Chat (empty considering you don't want to run this by chat) Run builtin:script extphp
Custom JAR Files
Nosotros do not take whatsoever responsibleness for whatever of the links used in this and the following sections regarding custom JARs. These links are provided by the JAR authors themselves and they are not checked by united states
All that is required to use a different server JAR is to place the file in the "jar" directory of your Multicraft installation and so set the "JAR File" field in your server settings to the name of the new file.
This will work fine for a vanilla Minecraft JAR, however, Craftbukkit JARs and other mods require different settings as their console output differs from the i of vanilla Minecraft. Also, just placing the JAR file in there will not brand it appear in the JAR selection then users tin't select information technology.
This is where the ".jar.conf" files come up into play. These files are used to determine the JAR file choice in the server settings and they are likewise capable of completely reconfiguring the output that Multicraft expects from the server. They are flexible enough to fifty-fifty run different Games with the correct settings.
For most users the supplied .jar.conf files will be plenty. If you put a new Craftbukkit JAR in place you lot tin can just copy the existing "craftbukkit.jar.conf" to a new proper name, e.g. "craftbukkit_dev.jar.conf" and then edit the .conf file to match the new JAR settings. The most important setting to modify would be the "proper name" setting so it can be distinguished from the other JARs in the selection. The "source" and "configSource" settings should also be changed to make certain it's not overwritten with the files listed in the old .conf. The "source" setting defines where the JAR is downloaded when the update function in the panel is used, the "configSource" setting defines where the .conf file can update itself from (if you don't change that your .conf volition be overwritten with whatever is institute under "configSource" the adjacent time y'all update the .conf file).
Nearly of the settings in the .conf files are documented directly in the comments of the default craftbukkit.jar.conf files supplied with Multicraft. For advanced use of these files delight see the ".jar.conf Files" Documentation folio.
Defining which .conf file to employ
By default Multicraft will use a conf file with the same name as the JAR file used. For example, using "minecraft_server.jar" will use the .conf file "minecraft_server.jar.conf".
With the 2.0.0 release Multicraft supports using .conf files by matching the JAR name against a regular expression. You tin observe the full documentation of this feature in the "server_configs.conf.dist" file that ships with Multicraft. Just rename this file to "server_configs.conf" and edit it to adjust your needs. No daemon restart is required for these changes to take effect.
Instance:
[match] canarymod.jar.conf=canary
This will use the file "canarymor.jar.conf" for any JAR file that contains "canary" in the name.
Default settings for all JARs
Starting with two.0.0 Multicraft will read the default settings to use for all JARs from the config file "default_server.conf". Yous tin can rename the "default_server.conf.dist" that ships with Multicraft to "default_server.conf" and edit the file to your needs to override the default values. Whenever no .conf file is found or the .conf filed doesn't explicitly set up a value the values from this file will exist used.
CanaryMod
Yous can simply download the canarymod.jar.conf file and place information technology in the "jar" directory of your daemon to be able to use CanaryMod like Craftbukkit or vanilla Minecraft.
Alternatively you lot tin directly add together CanaryMod in your panel using the post-obit values under Settings->Update Minecraft->Add or Remove Files: 
The "File URL" is:
http://dl.visualillusionsent.internet/minecraft/CanaryMod/latest.php
The "Conf URL" is:
http://www.multicraft.org/download/conf/?file=canarymod.jar.conf
Tekkit/FTB
Tekkit/FTB and like mods tin exist run using the craftbukkit.jar.conf but please note that they are non officially supported at the moment. According to user feedback, the following instructions tin be used to set upwardly such a server:
- Make sure your .conf files for Craftbukkit are up to date under Settings->Update Minecraft
- Re-create the craftbukkit.jar.conf to Tekkit.jar.conf or ftbserver.jar.conf or like (note that these file names are example sensitive)
- Edit the new .jar.conf and change the setting "name" to how you want information technology to appear in the JAR dropdown
- Fix the "config" and "configSource" settings to empty as there are no official download locations for the JAR or the .conf
- Download the Tekkit/FTB package
- Put the jar from the downloaded package into the daemon "jar" directory, next to the .jar.conf you just created (make certain they are named the aforementioned, e.chiliad. Tekkit.jar and Tekkit.jar.conf)
- If the mod needs additional files to run extract the mod zippo file into the server directory where you intend to use the mod
- Make sure the files you have just extracted have the correct owner, it needs to be mcX:mcX, where X is the server ID
- Select the new JAR in the drib down for the server y'all have extracted the files to and get-go the server
Video Tutorial
Jacklin213 has created a YouTube video detailing the process of installing Tekkit with Multicraft.
Forge
Forge can be run using the craftbukkit.jar.conf with a few modifications but delight note that it's not officially supported at the moment. According to user feedback, the following instructions tin be used to prepare up such a server:
- Make sure your .conf file for Craftbukkit is up to date nether Settings->Update Minecraft
- Copy the craftbukkit.jar.conf to forge.jar.conf like (annotation that these file names are instance sensitive)
- Edit the new .jar.conf and change the setting "name" to how you desire it to appear in the JAR dropdown, due east.g. "name = Forge"
- Set the "config" and "configSource" settings to empty as at that place are no official download locations for the JAR or the .conf
- Set the "command" setting to the following:
command = "{JAVA}" -Xmx{MAX_MEMORY}M -Xms{START_MEMORY}Thou -Djline.terminal=jline.UnsupportedTerminal "@{JAR_DIR}/forge/unix_args.txt" - Download the Forge installer
- Run the following commands, replace VERSION with the Forge version used and suit paths as needed:
# Run Forge installer java -jar forge-VERSION-installer.jar --installServer=/home/minecraft/multicraft/jar/forge/ # Copy unix_args.txt to jar/forge binder find /dwelling/minecraft/multicraft/jar/forge/libraries/ -proper name 'unix_args.txt' -exec cp "{}" /home/minecraft/multicraft/jar/forge/ \; # Adapt paths in unix_args.txt to load libraries from the daemon "jar" directory sed -i 's,libraries,/home/minecraft/multicraft/jar/forge/libraries,one thousand' /dwelling house/minecraft/multicraft/jar/forge/unix_args.txt
StarMade
StarMade can be run using the StarMade.jar.conf file below but please note that StarMade is not officially supported at the moment. According to user feedback, the following instructions can exist used to set a StarMade server:
- Download the StarMade.jar.conf and identify information technology in the jar directory of your daemon
- Download and update the StarMade server
- Put the StarMade.jar from the StarMade server into the daemon "jar" directory, adjacent to the StarMade.jar.conf you just put in place
- Put the residue of the files from the StarMade directory of the StarMade server into the server directory where you intend to use StarMade
- Make sure the files you accept just extracted have the correct owner, information technology needs to be mcX:mcX, where X is the server ID
- Download starmade.sh and place information technology in the scripts directory of your daemon
- Chmod the starmade.sh to 755
- Select the StarMade JAR in the drop down for the server you have extracted the files to, salvage and restart
PocketMine-MP
PocketMine-MP can be run using the pocketmine.phar.conf file below. Thank you to Shoghi from pocketmine.cyberspace for providing this file!
The post-obit instructions can exist used to beginning a PocketMine-MP server:
- Download the pocketmine.phar.conf and place information technology in the jar directory of your daemon
- Download and install PocketMine into the directory "jar/pocketmine" of your daemon (the goal is to have PHP installed at "jar/pocketmine/bin/php5/bin/php")
- If you have not compiled PHP y'all can change the PHP path in the pocketmine.phar.conf to the PHP binary you want to utilize (information technology's the first argument in the "command" setting)
- Select the PocketMine JAR entry in the driblet down for your server, salvage and restart
- You tin can likewise update the pocketmine.phar file through the panel nether Settings->Update Minecraft
- If you lot see a setup sorcerer in the panel instead of the normal server startup you can simply send "Y" twice as a console command
Spigot and BungeeCord
Y'all tin can simply download the spigot.jar.conf or bungeecord.jar.conf file and identify it in the "jar" directory of your daemon to be able to use Spigot/BungeeCord like Craftbukkit or vanilla Minecraft.
Alternatively you tin can directly add Spigot/BungeeCord in your panel using the following values nether Settings->Update Minecraft->Add or Remove Files:
In the first field enter either "spigot.jar" or "bungeecord.jar". Go out the "File URL" empty and for the "Conf URL" enter one of the following depending on the JAR yous wish to install:
http://www.multicraft.org/download/conf/?file=spigot.jar.conf
or
http://www.multicraft.org/download/conf/?file=bungeecord.jar.conf
You tin can then go to Settings->Update Minecraft, select the new entry and update the "JAR" file normally.
Bedrock alpha
Linux
- Identify the following files in your daemon "jar" directory: bedrock.jar.conf bedrock.sh
- Make sure the "bedrock.sh" file is executable (chmod 755)
- Create a directory "bedrock" in the "jar" directory
- Extract the contents of the official boulder server zip file into this new "bedrock" directory
- Brand certain the "rsync" command is bachelor on your system
Windows
- Identify the post-obit files in your daemon "jar" directory: bedrock_windows.jar.conf bedrock.bat
- Rename the "bedrock.txt" file to "bedrock.bat"
- Create a directory "bedrock" in the "jar" directory
- Extract the contents of the official bedrock server nix file into this new "bedrock" directory
User Contribution: Updating BuildTools and Spigot (Windows Standalone)
Disclaimer: These are user contributed items, neither multicraft.org/xhost.ch GmbH nor the providing party assume any warranty whatsoever for any event equally a result of using whatever of the listed scripts, programs, instructions or other items.
BuildTools and Spigot update script past RedstoneFiend
Brand sure to edit the script and alter "C:\Bitnami" to the path to your Bitnami installation directory. Also, the "Updater" directory needs to be created inside this directory before running the script.
Server Templates (new in ii.0.0)
The server template feature has been added in Multicraft ii.0.0 to make information technology easier to deploy mods and pre-installed servers. Templates can consist of files and scripts that are used to initialize the server directory.
The basic office of a template is to provide a gear up of files that will be copied to the server directory earlier the server starts. To attain this all you accept to exercise is to create a new folder in the "templates" directory of your daemon (by default "/home/minecraft/multicraft/templates") and put all files you want to accept copied to a server into the "files" directory inside your new template binder.
You tin also create a template.conf file and use it to give your template a user readable proper noun and configure some other settings such as the JAR file setting the server should be set to after using this template. The template.conf of the example template supplied with Multicraft (in the folder "cleanmodsplugins") contains extensive documentation of all available settings in the comments.
A more advanced template can besides run scripts at diverse steps in the template setup process. Please meet the readme.txt in the "templates" directory of your daemon or in the Multicraft bundle for more than information on this feature.
Mod motorcar-setup
Certain mods require boosted files to work correctly. Using a simple template you tin can brand Multicraft automatically copy the files into the server directory when the sever starts. Past default the template will even so have to be selected for installation by the user. There are 2 additional steps y'all tin can accept to change the behavior of automatic modern setup:
Suggesting templates for JARs
To make sure the user knows about the correct template for a selected JAR you lot can use the "suggestTemplate" setting in the .jar.conf file of your JAR file, for instance:
[settings] suggestTemplate = template1
This will ask the user to use the sample template and forward them to the "Setup" folio with the correct values already filled in.
Automatically installing templates
Instead of having the user confirm the tempate to install yous can also silently forcefulness the template to be installed whenever the server is switched to a JAR by using the "forceTemplate" setting in the .jar.conf file of your JAR file, for instance:
[settings] forceTemplate = template1
Yous can modify the behavior using two additional flags:
- always Causes the template to be installed on every server start instead of just the first outset afterwards switching to the JAR
- delete CAUTION: Causes all server files to be deleted when the template is installed
These flags can as well be combined, for example "always,delete". To have a template named "template1" exist installed on every server beginning, the setting would be:
forceTemplate = template1|e'er
Examples
Simple templates for installing additional mod files
In it's simplest form a template is just a directory that contains a "files" directory with any kind of files in it. Upon installation of the template the files in the "files" directory will be copied to the server directory. The name of the template is the name of the directory within your "templates" directory. For example, two templates named "template1" and "template2" might look similar this:
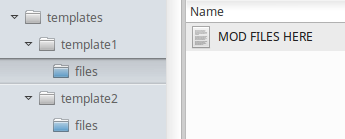
To have a JAR file install "template1" when that JAR file is selected, set the post-obit in the .jar.conf file:
forceTemplate = template1
In this instance that would cause the file "Mod FILES HERE" to be copied to the server directory the first time the server is started using this JAR.
Copy an additional examination.conf file to the server directory
copyfile.goose egg/ # Can either be a zilch file or a plain directory template.conf # The template configuration, optional files/ # Everything in here volition be copied to the server directory examination.conf
template.conf contents:
[full general] proper name=Copy test.conf
Configure the server with an additional config file, print a bulletin before installing the template, do mail service processing using a script, enable sure server startup parameters, disallow deleting the server directory every bit office of the template installation
configure.zip/ afterSetup.sh # This script volition be run later the setup has been completed template.conf files/ some_config.conf
template.conf contents:
[general] name=Configure Server for Modern setParams=1,3 [setup] neverDelete=true [commands] initialize=/bin/echo Server Configuration set to Modern
Copy additional mod files to the server and ready the JAR file of the server to use that new mod
craftbukkit.zip/ template.conf files/ Additional mod files required
template.conf contents:
[general] name=Install Craftbukkit setJarFile=craftbukkit.jar
Using MySQL / Decision-making a remote server
The Multicraft control panel can connect to a daemon running on a remote car. To enable this you have to use a MySQL database to which both the control panel and the daemon on the remote machine can connect.
Configuring the daemon
Edit your "multicraft.conf" and prepare the "database" setting to the shared MySQL database. Be certain to as well fill in the "dbUser" and "dbPassword" settings. For example if your MySQL server is running on one.two.three.four:
database = mysql:host=1.2.three.4;dbname=multicraft_daemon dbUser = *your MySQL user* dbPassword = *your MySQL countersign*
Replace the database proper noun (here "multicraft_daemon") and the user and countersign accordingly.
By default the daemon listens on the IP address "127.0.0.1" which means only connections from the local auto will be allowed. To let the panel to connect to the daemon from the exterior edit your "multicraft.conf" and alter the "ip" setting to the net IP. If the daemon is running behind a router, set "ip" to 0.0.0.0 and "externalIp" to your external IP. For instance, if the internet accost of your daemon machine is 2.iii.4.five:
ip = 2.3.4.5
After irresolute the "ip" setting anyone can connect to information technology and so make sure to set a strong daemon password in your "multicraft.conf" using the "countersign" setting, for example:
password = *strong daemon password*
Annotation that in the panel configuration instructions below we'll refer to this password in the last step of the installer.
Configuring the panel
If you lot nevertheless have the installer (install.php) in identify you lot can re-run it and under "Daemon Database" put in the information of the shared database. If you've already deleted the installer script you tin manually edit the file "protected/config/config.php" and fix "daemon_db", "daemon_db_user", "daemon_db_pass" to friction match the information you have put in your "multicraft.conf".
If the database is not yet initialized you can employ the installer (install.php) to initialize it.
The same daemon password you lot take put in your multicraft.conf has to be used on the panel every bit well, you tin either change the setting "Countersign for daemon connexion" in the last step of the installer or y'all can manually edit the file "protected/config/config.php" and set "daemon_password" to your daemon password.
Example:
'daemon_db' => 'mysql:host=1.2.3.4;dbname=multicraft_daemon', 'daemon_db_user' => '*your MySQL user*', 'daemon_db_pass' => '*your MySQL countersign*', 'daemon_password' => '*stiff daemon password*',
Configuring MySQL
The in a higher place assumes that your MySQL server is already accepting remote connections. If this is not the case you accept to configure MySQL to do so.
Secure MySQL
A first footstep should always be to run "mysql_secure_installation":
mysql_secure_installation
Say "Y" to all questions (except for the first 1 if yous don't want to change the root countersign).
Alter the Mind Address
Edit your "my.cnf" and modify the "demark-address" setting to your internet IP. If the setting does not exist you can create information technology in the "[mysqld]" section of that file. Brand certain to remove any line that reads "skip-networking". For example, if the net IP of your MySQL server is 1.2.iii.4:
bind-address=1.2.3.iv #skip-networking
Then restart MySQL:
service mysql restart
The service might be called differently on your system, for example "mysqld" instead of "mysql".
Grant Access to Daemon MySQL Users
The post-obit queries are run directly in MySQL. You can use any tool to access MySQL, from the control line it would be:
mysql -uroot -p
Replace "root" with the name of a privileged MySQL user.
It's recommended to create a new MySQL user for each daemon. For case if your daemon is running on 2.3.4.v:
GRANT ALL ON multicraft_daemon.* TO daemon1@'2.3.4.5' IDENTIFIED BY 'mysql_password_for_daemon1';
In the "multicraft.conf" of daemon 1 yous would so put:
database = mysql:host=1.2.iii.4;dbname=multicraft_daemon dbUser = daemon1 dbPassword = mysql_password_for_daemon1
It's also possible to use the same user for all daemons. In that case yous'd replace "TO daemon1@'2.3.4.5'" with "TO daemon@'%'" in the in a higher place example.
You tin can further restrict the database access of daemon users based on the following security recommendation: Separate Daemon and Panel Databases
Open Firewall / Router for MySQL
If yous are behind a firewall or a router brand sure that the MySQL server is accessible by the daemons. The default MySQL port is 3306. If you are using a unlike port you tin can adapt the "database" setting in your "multicraft.conf" accordingly, for case if the MySQL server is running on port 2345:
database = mysql:host=one.2.iii.iv;dbname=multicraft_daemon;port=2345
You lot can test if MySQL has been configured correctly from the control line of the daemon machine:
mysql -h 1.2.3.4 -u daemon1 -p multicraft_daemon
You should at present be able to log in with the MySQL password you take set for daemon 1 before.
Deject Installation / Mass Deployment
With the Dynamic license i Multicraft control panel tin can manage multiple Minecraft instances distributed over multiple concrete or virtual machines.
To utilise Multicraft in such a configuration:
- Multicraft has to be configured for remote functioning (meet Using MySQL to a higher place) with the same database configuration for all the daemons
- Every daemon has to have a unique ID listed in its configuration file (setting "id" in your "multicraft.conf")
Once this is done each server tin can dynamically exist assigned to one of the running daemons directly in the server settings. The daemons are automatically detected equally soon as they are started trough an entry they create in the shared database.
Adding Region Fixer support
Multicraft comes with a feature that allows you to run an arbitraty globe repair tool, for instance "Region Fixer" (View on GitHub).
In order to configure Multicraft to utilize Region Fixer you can apply the following instructions:
- Download and extract Region Fixer to the "jar" directory of your daemon and brand sure it'due south in a directory called "region-fixer". For example:
cd /home/minecraft/multicraft/jar wget https://github.com/Fenixin/Minecraft-Region-Logroller/archive/principal.aught unzip master.zippo mv Minecraft-Region-Logroller-master region-fixer
- Download the repairtool.jar.conf and place it in the "jar" directory equally well, make sure it'due south named "repairtool.jar.conf".
- Enable the characteristic under "Settings"-"Panel Configuration": "Bear witness the repair tool push button for"
Changing the port of the standalone webserver (Windows)
If your port 80 (or 443 for HTTPS) is already in employ by something else the installer will automatically ask you lot which port information technology should use.
Changing the port afterward the installation is possible besides. You lot can only edit the file "Multicraft\config\httpd.conf" and modify the SRVPORT and/or SRVPORT_SSL settings at the acme as needed.
Later completing these changes you demand to restart the "Multicraft apache" service in the Windows Services panel.
How exercise I get FTP access to my server?
In that location is a YouTube video explaining this:
Multicraft Curt: Requite FTP access to a user
Accepting the Minecraft EULA
Minecraft versions later one.7.ix require you lot create a file called eula.txt that contains the line "eula=truthful" in your server directory.
For individual servers
If you just want to accept the eula for your server information technology is sufficient to create this file or change the line to "eula=true" if it already exists. You can apply your console FTP file access to achieve this.
For server providers
Users tin can use their FTP access to edit the eula.txt file as mentioned above. If you desire to facilitate accepting the EULA or even automate information technology there are several ways you can do that using Multicraft. Below you volition find a few examples.
Instance 1 - Add a config file entry
You tin configure the panel to care for the new eula.txt as a server configuration file and then users can alter it without editing the file manually. Just become to "Settings"->"Config File Settings" and click on "New Config File Setting". Fill in the fields like this:
| Proper noun | Minecraft EULA |
| Enabled | True |
| File | eula.txt |
| Options | {"eula":{"name":"Take Minecraft EULA","select":"bool"}} |
| Type | Property File |
Your users tin can then have the EULA past going to "Files"->"Config Files"->"Minecraft EULA".
Example 2 - Add together an "Accept EULA" push button to the server settings (advanced)
On your panel, add the following code to "protected/controllers/ServerController.php" after line 172:
example 'accept_eula': if (Yii::app()->user->can($id, 'edit') && !McBridge::get()->serverCmd($id, 'run:builtin:script accept_eula')) { repeat McBridge::get()->lastError(); } suspension; Add the following code to "protected/views/server/view.php" after line 368:
$attribs[] = assortment('label'=>Yii::t('mc', 'Minecraft EULA'), 'type'=>'raw', 'value'=>CHtml::ajaxButton(Yii::t('mc', 'Accept EULA'), '', array( 'type'=>'Mail', 'data'=>array('ajax'=>'accept_eula', Yii::app()->asking->csrfTokenName=>Yii::app()->asking->csrfToken,), 'success'=>'role(e) {if (east) warning(east);}'))); Then on the daemon, create or edit the file "scripts.conf" in your daemon directory (next to the multicraft.conf file) and add:
[accept_eula] command={BASE_DIR}/scripts/accept_eula.sh and create a file called "accept_eula.sh" in the "scripts" directory that contains:
#!/bin/sh repeat 'eula=true' > "$SERVER_DIR/eula.txt"
And make sure it tin be executed:
# chmod 755 scripts/accept_eula.sh
Please note that the script needs to use the Unix line ending format so it's recommended to create information technology directly under Linux instead of creating it nether Windows and uploading it.
Your users can at present click this button to automatically create the eula.txt file.
Example 3 - Automatically create the file (avant-garde, Linux multiuser only)
This is similar to the suggestion above but the script will be run automatically every time a server starts. You need to brand sure your users are informed about the EULA and this acceptance.
To enable the script, simply change the "userAgentPrepare" setting in your multicraft.conf to:
userAgentPrepare=scripts/accept_eula.sh
Make certain that at that place is no # in front of that line. After the change the daemon needs to exist restarted for the change to accept effect.
The script can exist created the aforementioned way as described in the previous point:
Create a file called "accept_eula.sh" in the "scripts" directory that contains:
#!/bin/sh echo 'eula=true' > "$SERVER_DIR/eula.txt"
And make certain it can be executed:
# chmod 755 scripts/accept_eula.sh
Please annotation that the script needs to use the Unix line ending format so it'due south recommended to create information technology directly nether Linux instead of creating it under Windows and uploading information technology.
This script will now run every time a server starts.
Limit Disk Infinite / Quota Support (Linux just, new in 2.0.0)
If you take already configured Quota support for your arrangement you tin can enable the Multicraft quota feature by editing your multicraft.conf file and changing:
#enableQuota = imitation
to
enableQuota = truthful
or by calculation the setting to the [system] department if it does not exist still. The other "quota*" settings can exist used to fine tune this feature.
The daemon has to be restarted for the enableQuota setting modify to have result.
Configure Linux Quota
If you have not yet enabled quota back up on your Linux system you tin can practice so past following these steps:
- Install the "quota" package, for example:
apt-get install quota
oryum install quota
- Edit the file /etc/fstab and add usrjquota=aquota.user,jqfmt=vfsv0 to the mountain options of the filesystem where your servers volition be located. For example, change:
/dev/sda1 /habitation ext4 defaults 1 ane
to/dev/sda1 /home ext4 defaults,usrjquota=aquota.user,jqfmt=vfsv0 1 1
- Remount the filesystem, create initial quota files, enable quota:
mount -o remount /home quotacheck -avum quotaon -avu
Replace /habitation with the path to the filesystem you want to enable quota for.
Configure User Friendly URLs
Yous can configure the panel to bear witness user friendly URLs, for case:
http://example.com/server/1
instead of:
http://case.com/index.php?r=server/view&id=one
To achieve this yous tin edit the file protected/config/internal/application.php and look for the following section:
// uncomment the following to enable URLs in the format index.php/server/1 /*'urlFormat'=>'path',*/ // uncomment the post-obit to hide the index.php part of the URL /*'showScriptName'=>false,*/
Simply remove the "/*" and "*/" effectually the "urlFormat" and "showScriptName" settings to actuate them. Note that the apache rewrite module (mod_rewrite) is required for these settings to work correctly. It'due south possible that these settings do not work correctly on your system and we practice not provide official support for enabling them.
Change the Console Direction
The direction of the panel/server log is configurable under "Settings"->"Panel Configuration" using the setting "Testify console from bottom to top". The default setting is "No" (panel goes from top to bottom).
Send mails using SMTP instead of PHP post()
If you desire to transport emails directly through an SMTP server instead of using the PHP post() function yous can edit the file protected/config/internal/application.php and look for the line:
'transportType'=>'smtp'
Remove the "/*" and "*/" around this block of lawmaking and configure the values accordingly to utilise your SMTP server.
Daemon Callbacks
The daemon allows you to claw into and influence certain events. You can configure callback scripts for these events that go passed a JSON string with the callback arguments. The render value is expected to be JSON formated likewise.
These callbacks can be configured in the [advanced] section of the multicraft.conf file like this:
[avant-garde] callbackServerStart = /path/to/script.py callbackServerStop = /path/to/script.py callbackServerLogLine = /path/to/script.py callbackServerChatMsg = /path/to/script.py callbackServerPlayerConnected = /path/to/script.py callbackServerPlayerDisconnected = /path/to/script.py callbackServerGetResourceUsage = /path/to/script.py (2.4.0+) callbackServerCommand = /path/to/script.py (two.4.0+)
Parameters marked with a * are mutable, meaning y'all can render them in the JSON response with a unlike value to override them.
The return value of the script has to be 0 on success and any other value on failure. Cancelable events will be canceled on failure.
| Callback | Parameters | Cancelable |
|---|---|---|
| callbackServerStart | id (int) ip* (string) port* (int) players* (integer) retentiveness* (integer) start_memory* (integer) earth* (string) working_directory* (cord) jarfile* (cord) template* (string) setup* (string) | Yes |
| callbackServerStop | id (int) ip (cord) port (int) players (integer) retention (integer) start_memory (integer, 2.4.0+) world (cord) working_directory (string) jarfile (string) template (string, two.four.0+) setup (cord, two.4.0+) state (cord) | Yeah |
| callbackServerLogLine | id (int) line* (string) | Yep |
| callbackServerChatMsg | id (int) fourth dimension* (string) sender* (string) message* (cord) | Yes |
| callbackServerPlayerConnected | id (int) player_id* (int) player_name* (string) player_ip* (string) player_banned* (string) player_level* (int) | No |
| callbackServerPlayerDisconnected | id (int) player_id* (int) player_name* (string) player_ip* (string) player_banned* (string) player_level* (int) | No |
| callbackServerGetResourceUsage | id (int) ip (string) port (int) players (integer) memory (integer) start_memory (integer) world (string) working_directory (string) jarfile (string) template (string) setup (string) pid (int) cpuUsage* (float) memoryUsage* (float) sysMemoryUsage* (float) memoryRss* (bladder) cpuCount* (int) quotaUsage* (float) | No |
| callbackServerCommand | id (int) ip (string) port (int) players (integer) memory (integer) start_memory (integer) world (cord) working_directory (string) jarfile (string) template (string) setup (string) success* (bool) success_string* (string) response* (list of strings/dicts) | No |
Example for script argument and render value:
{"setup":"","ip":"i.2.iii.4","start_memory":1024,"port":25565,"players":8,"working_directory":"","template":"","retention":1024,"earth":"earth","id":1,"jarfile":"minecraft_server.jar"} Windows Standalone: Update Coffee
- If you already have the new version of Java installed you tin can instruct Multicraft to apply that java.exe instead of the i that comes with the installer. To do that you can edit the file "Multicraft\config\multicraft.conf" and modify the "coffee =" setting to point to your Java installation, for example:
coffee = C:\Program Files\Java\jdk-17.0.1\bin\coffee.exe
- Alternatively you lot can update the Java version shipped with the standalone package by downloading a new version from Adoptium.net. Make sure to download the zip bundle, for example OpenJDK17U-jdk_x64_windows_hotspot_17.0.1_12.zip for Coffee 17. Then delete the contents of "Multicraft\vendor\java" and excerpt the contents of the "jdk-17.0.1+12" directory of the downloaded packet into "Multicraft\vendor\java".
Different Coffee Versions
By default the .jar.conf files phone call Java through the {JAVA} variable in the "command" setting, e.g.:
[outset] command = "{Java}" -Xmx{MAX_MEMORY}M -Xms{START_MEMORY}Grand -jar "{JAR}" nogui This variable will just be replaced by the "java" setting in your multicraft.conf file, past default:
java = /usr/bin/java
You tin can modify this setting to the path of the "java" binary you'd like to use.
If the unlike server types you offer require different Java versions information technology's no longer possible to use the same {JAVA} variable in all .jar.conf files. Instead you can use the path to the correct version of Java direct in that "command" setting, e.g.:
[start] command = /usr/bin/java -Xmx{MAX_MEMORY}Chiliad -Xms{START_MEMORY}Thou -jar "{JAR}" nogui That way you can ensure each JAR uses the correct Coffee version and for example keep {JAVA} for the version that is supported past about JARs or that is the current LTS release.
Source: https://www.multicraft.org/site/docs/howto
0 Response to "How to Upload Jar to Multicraft Ftp"
Enregistrer un commentaire